Robot Vision Part 2 : Perspective Correction
Homography Calculation and Perspective Transformation using OpenCV and Python
For an autonomous system to correctly analyze visual information on surfaces of objects, selecting the surface and rotating it to face the camera is a very effective practice. This is called perspective correction and in this blog I’ll try to explain how it works and how to achieve it with just a few lines of code. The complete code implementation can be found here.
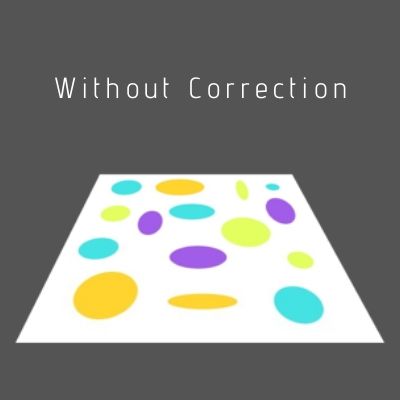
To better understand why it is so important. Take the example of a problem where a camera needs to classify between circles and ovals. Now, in the raw camera feed (left), it’s almost impossible to classy the items as all of them appear to be ovals. However, after doing a perspective correction of the image (right) , the camera appears to be facing the surface straight and now we can easily classify the items.

The Homography Matrix
The homography matrix relates the transformation between two planes. As the object is planar, the transformation between points expressed in the object frame and projected points into the image plane expressed in the normalized camera frame is a homography.
The homography can be estimated using the Direct Linear Transform (DLT) algorithm

Setting Things Up
If you went through Part 1 of the series, you can skip this part as the setup will be exactly same. We will be using a 7x4 chessboard for this process as it is easily available. We will use the chessboard image to create a reference image.You must have OpenCV 4.1 or higher and Python3. Pickle will be required for storing our calibration data for future use.
Code Walkthrough
Once we create a reference image using the 7x4 chessboard in the required orientation, the Homography Matrix can be easily calculated by taking a frame with the chessboard from the camera and using cv2.findHomography(objectPoints, imagePoints). So let’s read the reference image and find the mapping points (chessboard corners in this case).
import numpy as np
import cv2
import pickle

cam = cv2.VideoCapture(0)
ret, frame = cam.read()

# load the reference image
ref = cv2.imread('img/reference.jpg')

# find the chessboard corners
ret1, corners1 = cv2.findChessboardCorners(ref, (chess_h,chess_w), None)
ret2, corners2 = cv2.findChessboardCorners(frame, (chess_h,chess_w), None)
If the corners are found we calculate the Homography matrix and apply it on the frame using cv2.warpPerspective(frame, h_mat, (frame.shape[1], frame.shape[0]))
# Calculate homogrphy transform matrix
h_mat, status = cv2.findHomography(corners2, corners1)

# apply the perspective correction on the frame
transformed_frame = cv2.warpPerspective(frame, h_mat, (frame.shape[1], frame.shape[0]))

# display the image
cv2.imshow('result', transformed_frame)
cv2.waitKey(0)
Now that we have our Homography Matrix, we can store it using pickle.dump() and load it when required .
# store the data
f = open('perspective.pickle', 'wb')
pickle.dump(h_mat, f)
f.close()
Application
To do perspective correction. We can just load the Homography matrix from perspective.pickle and apply it to each frame of the camera.
# load the data
f = open('perspective.pickle', 'rb')
h_mat = pickle.load(f)
f.close()

cam = cv2.VideoCapture(0)

while(True):
	ret, frame = cam.read()
	transformed_frame = cv2.warpPerspective(frame, h, (frame.shape[1], frame.shape[0]))

	# Your Computation Here

	cv2.imshow('frame',transformed_frame)
And that’s it. However simple, this technique has many major application like stitching panoramas, camera pose estimation, feature point extraction and many more.